

colibr.org | Page 4
Home Blog Page 4

The Njahi Wars: A Bean Divided by History, Taste, and Identity

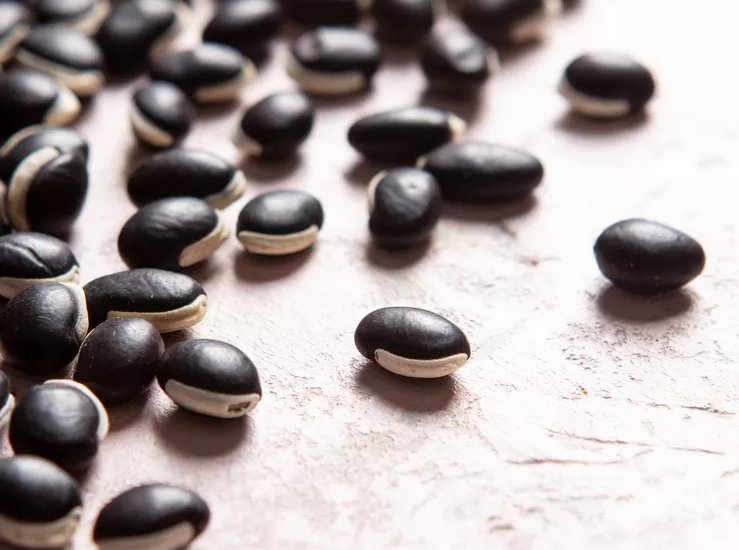
In the digital age, few culinary debates have sparked as much passion and controversy as the ongoing “njahi wars” in Kenya. What began as a simple recipe post by Kaluhi Adagala, a prominent Kenyan food writer, has evolved into a full-blown cultural and political discourse. At the heart of this debate lies njahi—a traditional bean native to Central Kenya, also known as Lablab purpureus or hyacinth bean.

The Nutritional Advocates

Supporters of njahi, including Adagala, champion its numerous health benefits. Rich in insoluble fiber, njahi is believed to aid in gut health, regulate blood pressure, and assist in blood sugar control by slowing the absorption of simple sugars. Additionally, it’s thought to help the body eliminate excess fluids through the kidneys and contains phenolic compounds that may aid in weight management.

The Critics’ Perspective

Contrastingly, many Kenyans view njahi with disdain. On social media platforms, especially Twitter, the bean has been subjected to ridicule. Descriptions range from “tastes like rusty iron nails cooked in soup” to “tastes like grief and abandonment issues.” Such sentiments reflect deeper cultural perceptions and biases, with njahi often labeled as “prison food” or a symbol of poverty.

Colonial Legacy and Agricultural Shifts

The roots of this aversion can be traced back to Kenya’s colonial history. Before British colonization, njahi was a staple in the Gikuyu community, valued not only for its nutritional benefits but also for its spiritual significance. It was associated with fertility and played a role in various cultural rituals.

However, the British colonial administration introduced foreign crops, such as French beans, which were deemed more suitable for export markets. This shift led to the marginalization of indigenous crops like njahi. By 1939, colonial officials noted that njahi had lost its prominence in local markets, a consequence of policies that favored foreign agricultural practices and crops.

Cultural Reclamation and Modern-Day Symbolism

In contemporary Kenya, njahi has become a symbol of cultural identity and resistance. Comedian Njugush’s satirical video, “Njahi: Human Beans Matter,” draws parallels between the marginalization of njahi and issues of social injustice, both locally and globally. By highlighting the bean’s historical significance and the injustices it has faced, Njugush uses humor to provoke thought and discussion.

The Culinary Divide

The njahi debate also underscores a broader culinary divide in Kenya. While urban centers may favor more globally recognized dishes, traditional foods like njahi remain integral to rural communities. The contrasting perceptions of njahi—viewed as a delicacy by some and as a symbol of poverty by others—reflect the complex interplay between tradition, modernity, and identity.

Conclusion

The njahi wars are more than just a debate over a bean; they are a reflection of Kenya’s ongoing struggle with its colonial past, cultural identity, and the dynamics of globalization. As discussions continue, it is essential to recognize the deeper meanings attached to food and the stories they tell about a nation’s history and values. Whether one views njahi as a cherished tradition or a relic of the past, it undeniably holds a place in the heart of Kenya’s culinary landscape.
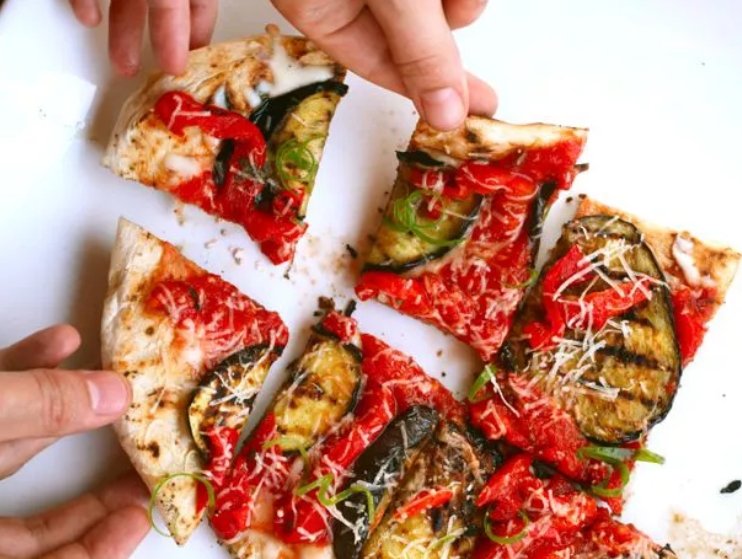
Mastering Grilled Pizza: A Step-by-Step Guide to Crispy, Smoky Perfection at Home

Grilling pizza is a delightful way to enjoy pizzeria-quality pies at home, especially during the summer months. The high heat of the grill imparts a smoky flavor and crispy crust that is hard to replicate in a conventional oven. Here’s a step-by-step guide to help you master the art of grilled pizza.​

Step 1: Choose the Right Day

Begin by selecting a day with favorable weather conditions. Ideally, plan to make your dough at least a day in advance. For instance, a sunny, warm day can set the perfect backdrop for grilling. By the time you’re ready to start, the temperature should be comfortable for outdoor cooking.​

Step 2: Prepare the Dough

The foundation of any great pizza is its dough. A New York-style pizza dough recipe works well for grilling. Prepare the dough the night before and allow it to rise in the refrigerator overnight. Before grilling, let the dough come to room temperature for easier handling. If you’re concerned about stretching the dough, reducing the hydration slightly can make it more manageable.​

Step 3: Gather Your Ingredients

Grilled pizza cooks quickly, often in under a minute per side, depending on the grill’s heat. To ensure a smooth process, have all your ingredients prepped and within reach. This includes sauces, cheeses, vegetables, meats, and any other toppings you plan to use. Being organized will help you assemble the pizza swiftly once the dough is on the grill.​

Step 4: Preheat the Grill

Set up your grill for direct heat cooking. If using a charcoal grill, arrange the coals to create a hot zone for searing the dough and a cooler zone for melting the toppings. For gas grills, preheat to a high temperature, ensuring the grates are clean and well-oiled to prevent sticking.​

Step 5: Grill the Dough

Place the stretched dough directly onto the hot grill grates. Allow it to cook for about 1-2 minutes until the underside develops grill marks and the dough begins to set. Using tongs or a spatula, flip the dough over. Quickly add your prepared toppings, starting with cheese, followed by sauce. Return the pizza to the grill and cook for an additional 2-3 minutes until the crust is golden and the cheese is melted.​

Step 6: Serve and Enjoy

Once cooked, remove the pizza from the grill. Let it rest for a minute before slicing to allow the toppings to set. Serve immediately and enjoy the fruits of your labor.​

Additional Tips

  • Dough Consistency: A slightly firmer dough is preferable for grilling, as it holds up better on the grill grates.​
  • Topping Selection: Opt for toppings that cook quickly and release minimal moisture to prevent sogginess. Pre-cooked vegetables, cured meats, and cheeses like mozzarella or fontina are excellent choices.​
  • Grill Maintenance: Keep the grill lid closed as much as possible to maintain consistent heat and prevent flare-ups.​
  • Safety First: Always use appropriate tools and handle the grill with care to ensure a safe cooking experience.

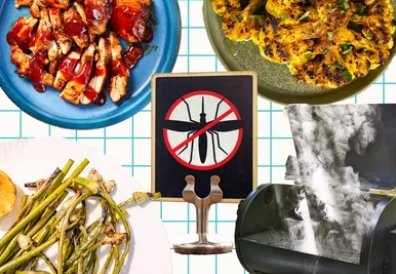
Bite-Free Barbecues: How to Keep Mosquitoes Off the Guest List This Summer

As the sun sets and the grill heats up, the last thing you want is to share your backyard barbecue with a swarm of mosquitoes. These tiny invaders can quickly turn a delightful evening into an itchy ordeal. Fortunately, with a few thoughtful strategies, you can keep your outdoor gatherings mosquito-free and enjoyable for all.​

1. Eliminate Standing Water

Mosquitoes are prolific breeders, requiring as little as a tablespoon of water to lay their eggs. To prevent them from multiplying in your yard, regularly empty containers like plant saucers, birdbaths, and kiddie pools. Even small amounts of stagnant water can harbor mosquito larvae, so vigilance is key.​

2. Utilize Fans to Disrupt Mosquito Flight

Mosquitoes are weak fliers and struggle against wind. Setting up fans around your dining area creates a breeze that makes it challenging for mosquitoes to navigate, effectively keeping them at bay. This method is not only effective but also adds a cooling effect to your outdoor space.​

3. Choose the Right Lighting

Traditional incandescent and halogen lights emit UV rays that attract mosquitoes. Opt for LED lights or yellow bug lights, which are less appealing to these pests. Positioning lights away from your dining area can also help reduce mosquito attraction.​

4. Incorporate Mosquito-Repellent Plants

Certain plants naturally repel mosquitoes due to their aromatic oils. Consider placing pots of citronella, lavender, basil, or marigolds around your patio or dining area. These plants not only enhance the ambiance but also serve as a natural deterrent to mosquitoes.

5. Serve Food Strategically

Uncovered food is a beacon for mosquitoes. Keep dishes covered with mesh domes or lids to prevent attracting pests. Serving food indoors or in enclosed areas can also minimize exposure to insects.​

6. Maintain Cleanliness

Trash bins should be sealed tightly and placed away from dining areas to avoid attracting mosquitoes and other pests. Regularly dispose of garbage and clean up food spills promptly to eliminate potential food sources for insects.​

7. Schedule Events Wisely

Mosquitoes are most active during dawn and dusk. Planning your barbecue for midday or early afternoon can help you avoid peak mosquito activity, allowing you to enjoy your meal without the nuisance of bites.​

8. Use Repellents Wisely

Topical repellents containing DEET, picaridin, or oil of lemon-eucalyptus can be effective when applied to exposed skin. However, use them sparingly around food and ensure they are safe for all guests, including children.​

9. Consider Professional Help

If mosquitoes are a persistent problem in your area, consulting with a pest control professional can provide long-term solutions. They can assess your yard and recommend treatments to reduce mosquito populations effectively.​

By implementing these strategies, you can create a mosquito-free environment that allows your guests to focus on enjoying good food and great company. Remember, a little preparation goes a long way in ensuring your backyard barbecue is a success.

Why the French Eat Cheese Solo—And How You Can Too

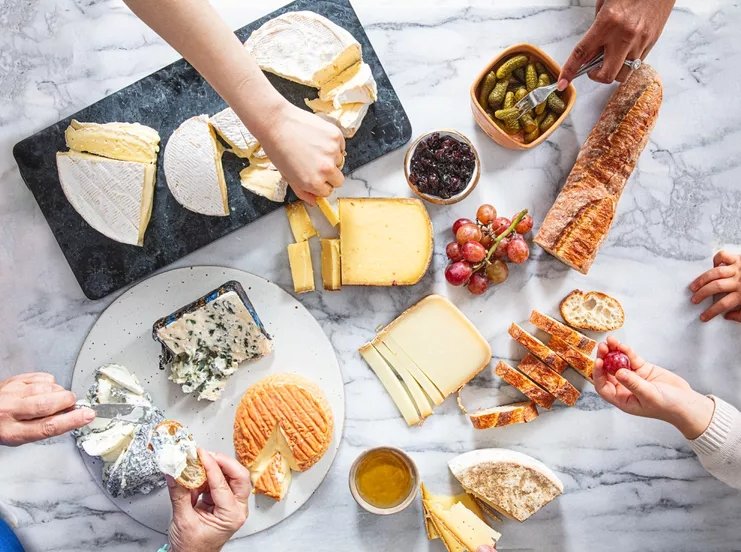
In America, cheese is often treated more like a co-star than the main act. It’s draped over burgers, melted into mac and cheese, or layered on a pizza. Even when it steps into the spotlight—like on a charcuterie board—it’s usually accompanied by a chorus of crackers, fruits, jams, and cured meats. But in France? Cheese doesn’t need the backup singers. It takes center stage, confidently served all on its own, with no distractions.

This fundamental difference reveals more than just a serving style—it highlights a cultural distinction in how we think about cheese.

Cheese: An Ingredient vs. An Experience

“In the U.S., I think we’re still getting over cheese being an ingredient,” says John Montez, a certified cheese professional and training manager at Murray’s Cheese in New York. “So it’s still a little bit strange, this idea of having cheese on its own.”

For many Americans, eating plain cheese might feel incomplete. But in France, cheese is savored like a fine wine or a perfectly ripe fruit—it’s an experience, not a side note. And there’s something liberating about that. Sitting down with a few thoughtfully chosen pieces of cheese can be just as satisfying as any full meal, maybe more so.

If you’re curious to adopt this more minimalist, French-inspired approach to cheese, you don’t need to book a flight to Paris. With a little know-how and a willingness to slow down, you can create a simple, elegant cheese tasting right at home.

How to Build a Beautiful French-Style Cheese Plate

You won’t need a Pinterest-worthy board piled high with figs and cured meats. You’ll just need good cheese, a sense of adventure, and a willingness to taste.

Start with Three to Five Cheeses

When it comes to building a cheese plate, less is more. Montez suggests choosing three to five cheeses. Odd numbers tend to look more visually balanced on a plate, and three allows for just enough variety without overwhelming your palate.

More important than quantity is contrast. A well-curated cheese plate should showcase a range of textures, flavors, and milk types.

Vary Texture and Flavor

A classic formula is one hard or semi-firm cheese, one soft, and one blue. For example:

  • Hard/Semi-Firm: A French Alpine-style cheese like Comté offers nutty, slightly sweet notes with a satisfying firmness.
  • Soft: A gooey, buttery Brie or Camembert provides a luscious, spreadable contrast.
  • Blue: The sharp tang and creamy crumble of Roquefort rounds out the trio with boldness and funk.

Mixing milk types can add even more depth. Try including a cow’s milk cheese alongside a goat’s milk cheese like Valençay, and a sheep’s milk option like Ossau-Iraty.

Talk to a Cheesemonger

If you have access to a cut-to-order cheese shop, take advantage of it. Cheesemongers are there to help guide your journey. “The best way to learn about cheese is to eat cheese,” Montez says. Ask to taste a few options and let their recommendations lead you into new territory. Don’t be shy—tasting is part of the process.

Even grocery stores with decent cheese counters often have someone knowledgeable behind the counter. Strike up a conversation, mention your preferences, and see where it leads.

Serve Simply

To truly enjoy cheese the French way, skip the crackers and jams. Serve the cheese at room temperature on a clean wooden board or plate, and give each cheese a bit of space to breathe. Provide a separate knife for each variety if possible to avoid flavor cross-contamination.

If you want to include a side, keep it simple: maybe a baguette or slices of country bread, served on the side and not beneath the cheese. Let the flavors speak for themselves.

French Cheeses to Try

Whether you’re at a local cheese shop or planning a trip to France, here are a few must-try French cheeses that represent a range of textures and milk types:

  • Comté (Cow’s milk): Nutty, firm, and aged to perfection—an excellent starting point for a hard cheese.
  • Brie de Meaux (Cow’s milk): Rich, creamy, and decadently soft. A classic that never goes out of style.
  • Roquefort (Sheep’s milk): A pungent blue with assertive tang and salty intensity.
  • Valençay (Goat’s milk): A pyramid-shaped goat cheese with a delicate ash coating and lemony brightness.
  • Epoisses (Cow’s milk): For the daring cheese lover, this washed-rind cheese is known for its strong aroma and luxurious interior.

Traveling to France? Seek out local, raw milk versions of these cheeses that may not be available stateside. The same names can taste remarkably different when you try the real-deal versions in their home terroir.

The Takeaway: Cheese Is Enough

Eating cheese on its own might feel like a departure from American norms, but it’s a delicious and rewarding one. It invites you to slow down and savor, to pay attention to the subtle differences in flavor and texture, and to appreciate the craft behind each bite.

So the next time you reach for the cheese drawer, consider skipping the crackers and fixings. Instead, slice up three or four cheeses, pour a glass of wine (or tea, if that’s more your speed), and give cheese the moment in the spotlight it deserves.

Sauté Pan vs. Skillet: Understanding the Subtle Differences and When to Use Each

In the world of cookware, the sauté pan and skillet are two essential, versatile pans that frequently make their way into home kitchens. While both are used for similar cooking techniques, the subtle differences in design can make a big impact on your cooking results. From the way they handle heat to the volume they can accommodate, knowing when to use each pan—and whether you need both—can make all the difference in your kitchen.

The Shape: A Matter of Sides

The primary difference between a sauté pan and a skillet comes down to one defining feature: the shape of their sides. A sauté pan is characterized by its wide, flat bottom with relatively tall, straight sides. This design is perfect for cooking methods that require even heat distribution and liquid retention. On the other hand, a skillet has sloped sides that flare outwards, creating a larger surface area at the top. This slight variation in shape plays a major role in how these pans perform in the kitchen, affecting everything from surface area to evaporation rates.

But what does this difference mean in practical terms? Let’s dive into the key factors that separate the two.

Surface Area: More Room for Cooking in a Sauté Pan

When it comes to surface area, the sauté pan has the advantage. While pans are typically measured by the diameter of their lip, the cooking surface is what actually matters in the kitchen. Due to the straight sides of a sauté pan, it can provide a larger, more efficient cooking area. For example, a 12-inch sauté pan offers about 113 square inches of cooking space, which is ideal for tasks like searing multiple pieces of meat or cooking vegetables.

In contrast, the skillet, with its sloped sides, loses some of that surface area. A 12-inch skillet might only provide around 79 square inches of usable space, which means you have 30% less room to work with. So, if you’re looking to cook a larger batch of food—say, 12 pieces of chicken at once—a sauté pan will likely be the better choice. With a skillet, you may find yourself needing to cook in batches, which can be more time-consuming and less efficient.

Volume: More Liquid, Less Splashing in a Sauté Pan

The straight sides of a sauté pan not only provide more cooking space but also allow you to use a larger volume of liquid. If you’re braising meats or making sauces, a sauté pan’s design helps to keep the liquid contained, preventing splashes and making it easier to control the cooking process. This is particularly helpful when you’re working with dishes that require long, slow cooking or those that involve a significant amount of liquid, such as braising chicken thighs or cooking meatballs in oil.

In contrast, the angled sides of a skillet make it less effective at retaining liquids. The liquid tends to spread out, making it harder to manage and more prone to splashing. The sauté pan’s ability to hold liquid efficiently also means it’s better at minimizing evaporation. With a tight-fitting lid, a sauté pan can trap steam and keep moisture in, which is a big advantage when cooking stews or sauces that need to simmer for long periods.

Weight: A Heavy Duty Sauté Pan vs. A Lighter Skillet

Another difference between these two pans is weight. Because of its wider base and higher sides, a sauté pan tends to be heavier than a skillet of the same diameter. This added weight can make a sauté pan feel a bit more cumbersome, especially when lifting or moving it around. Some sauté pans even come with a helper handle opposite the main handle to assist with lifting, which can be particularly useful when you’re dealing with a full pan of food.

However, the weight of a sauté pan isn’t necessarily a downside—it can actually be an asset when the pan is stationary, as the added mass helps to distribute heat more evenly. But when it comes to tossing food or shaking the pan to promote even cooking (as you might when making stir-fries or sautéing vegetables), the lighter weight of a skillet is a big advantage. The flared sides allow for easier movement of the contents, making it easier to stir or toss food without worrying about spills.

Tossing and Stirring: Skillets for Agile Cooking

For many home cooks, the ability to toss or stir ingredients in the pan is a crucial part of cooking. Skillets excel in this regard due to their lighter weight and sloped sides. The flared shape allows you to toss ingredients around the pan without the risk of them falling out. Whether you’re making a stir-fry, scrambling eggs, or browning ground meat, the skillet’s design allows for quick, efficient movements.

In contrast, the sauté pan’s straight sides can make tossing a bit trickier. While it’s certainly possible, it requires a bit more finesse to avoid food spilling over the sides. That said, sauté pans are fantastic for tasks that require steady, controlled cooking. They’re excellent for searing, simmering, and even shallow frying, where tossing isn’t necessarily required.

Do You Really Need Both?

Now that we’ve established the differences, the question remains: do you need both a sauté pan and a skillet in your kitchen? The answer depends largely on your cooking style and the types of dishes you regularly prepare.

If you often cook large meals that require a lot of liquid or surface area, such as braises, stews, or dishes involving multiple pieces of meat, a sauté pan will be indispensable. It’s also a great all-purpose pan that can handle nearly every task, from searing to simmering.

On the other hand, if you do a lot of quick cooking, like stir-frying, scrambling, or sautéing vegetables, the skillet’s lightweight, flared design may be more appropriate. The ease with which you can toss ingredients and the larger cooking surface can make the skillet the go-to choice for fast, high-heat cooking.

Conclusion: Choosing the Right Pan for the Job

While both sauté pans and skillets are versatile tools in the kitchen, their differences in shape have a significant impact on how they perform. The sauté pan excels in tasks that require larger surface areas, more liquid, and controlled heat, while the skillet shines in quick, agile cooking that involves tossing or stirring. Ultimately, understanding these differences can help you decide which pan is best for your specific cooking needs—and whether or not you need both in your kitchen arsenal.

The Art of Perfect Pie Dough: A Simple Yet Crucial Technique

Pie dough may seem like a simple recipe—flour, butter, and a touch of water—but in reality, it’s a finely tuned balance where every detail matters. For those who find pie crust-making daunting, this method might feel like a high-stakes culinary challenge. However, I’ve always found comfort in its straightforwardness. The simplicity of the ingredients means that technique is the true star, and once you understand the basics, you’ll realize how much control you have over the outcome. Here’s a guide to creating a flaky, tender, and perfectly structured pie dough every time.

1. Flour and Butter Matter More Than You Think

While basic pantry ingredients like sugar and salt are nearly interchangeable, flour and butter are where the magic—and potential pitfalls—lie. These two components are not just the building blocks of the dough, but also the key players that determine whether your pie crust will be flaky and crisp or soggy and tough.

When choosing flour, opt for all-purpose flours with around 10% protein content. Popular brands like Gold Medal, Pillsbury, and Immaculate are perfect choices for a balanced dough. The protein content of flour directly affects gluten development, which is essential for texture. Too much protein, as in bread flour, can make your dough tough, while too little, as in cake flour, can prevent it from holding together properly. A balanced flour ensures your dough is both easy to work with and bakes up beautifully flaky.

Butter is another ingredient that warrants careful attention. Stick with American-style butter, which typically has 80% milk fat. European butters, which have higher fat content and a creamier texture, may seem like an upgrade, but they can make the dough too soft, especially when paired with a high-protein flour. This can lead to greasy, soggy dough that’s difficult to handle. For my recipe, American butter provides just the right amount of fat, yielding a tender, flaky crust without compromising the structure.

2. Temperature Is Key: Cool, Not Cold

Pie dough is all about butter. Nearly half of your dough’s mass comes from butter, and its temperature plays a huge role in the final product. At colder temperatures, the dough can become too crumbly and difficult to roll out. On the other hand, if the butter is too warm, the dough can become sticky and tough to handle.

The ideal temperature range for pie dough is between 68°F and 72°F. This keeps the dough cool and pliable, allowing for the perfect texture. To keep the dough at this sweet spot, there are a few simple tricks. If you’re working in a warm kitchen, chill your flour in the fridge for a few minutes before starting. During colder months, slightly warmer tap water can help bring the dough back to a manageable consistency without overcompensating for a chilly kitchen. By keeping the dough within this optimal temperature range, you’ll avoid issues like cracking, tearing, or overly sticky dough that won’t cooperate when it’s time to roll it out.

3. Big Butter Chunks Make Big Flakes

The key to creating a flaky pie crust lies in the size of the butter chunks. While some recipes call for tiny, pea-sized bits of butter, I’ve found that bigger pieces work wonders for achieving that iconic flakiness. When you add cold butter to your dry ingredients, aim to cut it into cubes no smaller than half an inch. The goal is to keep the butter in larger chunks, which will melt during baking and form pockets of steam that create those irresistible flaky layers.

Once the butter is in large cubes, gently press each piece with your fingers or a pastry cutter to flatten it slightly. This technique helps break the butter into layers without overworking the dough, ensuring that the final product isn’t too dense or greasy. The result is a crust that has just the right amount of structure and flakiness, without any of the undesirable qualities that come from overworking the dough or using smaller butter pieces.

4. The Right Amount of Water Makes All the Difference

When it comes to adding water to your pie dough, precision is key. Too little water, and your dough will be too dry to hold together; too much, and you risk activating too much gluten, resulting in a tough crust. The trick is to add just enough water to bring the dough together. Start by adding small amounts of cold water at a time, mixing it gently until the dough begins to form a ball.

It’s important to avoid adding too much water, as it can make the dough too sticky and interfere with the delicate balance of fat and flour. If you find your dough is too crumbly, you can always add a little more water, but it’s better to err on the side of caution and gradually incorporate liquid rather than adding too much all at once.

5. Rest the Dough for Better Results

Once your dough is formed, it’s essential to let it rest in the fridge for at least 30 minutes before rolling it out. This resting period allows the gluten to relax and the dough to chill, making it easier to roll out without it shrinking or becoming tough. It also helps the fat in the dough to solidify, which contributes to a flakier texture once baked. While it might be tempting to skip this step, taking the time to rest your dough will pay off in the final product.

Conclusion: Perfecting Pie Dough, One Step at a Time

Pie dough is often seen as a challenging recipe, but once you understand the importance of ingredients, temperature, and technique, the process becomes more intuitive. By selecting the right flour and butter, keeping the dough at the right temperature, and using the right amount of water, you’ll have the foundation for a perfect pie crust. The addition of big butter chunks and allowing the dough to rest will ensure your pie has that ideal flaky texture that everyone loves.

With a little practice and patience, you’ll be able to make pie dough with confidence, knowing that each step is building toward a delicious, golden crust. So, the next time you tackle a pie, remember: the devil is in the details, and the right technique will take you a long way toward pie perfection.

Beyond Ketchup: 8 Creative Hot Dog Toppings to Try

Hot dogs are a summer staple, typically served with the classic trifecta of ketchup, mustard, and relish. But why stop there? These humble franks deserve a little more flair, and with a bit of creativity, you can elevate your hot dog game to new heights. Whether you’re craving something sweet, savory, or spicy, there’s a topping combination to suit every taste. Here are eight mouthwatering hot dog topping ideas to try the next time you fire up the grill.

1. The Tiki Dog

Transport yourself to a tropical paradise with this fun and flavorful twist on the traditional hot dog. Inspired by the irresistible combination of bacon-wrapped chicken skewers with pineapple and teriyaki sauce, this version involves wrapping the hot dog in bacon for extra crunch and flavor. Once the bacon is crisped up, the hot dog is brushed with a generous coating of teriyaki sauce. Place the glazed frank in a toasted bun and top it off with grilled pineapple, chopped red onions, and a light drizzle of additional teriyaki sauce. The sweetness of the pineapple, the savory bacon, and the tangy sauce come together in perfect harmony for a truly unforgettable bite.

2. The Frito Pie Dog

Frito pie is a Texas classic—a comforting bowl of chili topped with Fritos and garnished with all your favorite fixings. This summer-friendly version swaps the chili bowl for a hot dog, topped with the same ingredients that make Frito pie so delicious. The hot dog is dressed with a hearty serving of chili, topped with a generous sprinkle of cheddar cheese, green onions, fresh cilantro, jalapeños, and a dollop of sour cream. The crispy Fritos add the perfect crunch, transforming your regular hot dog into a Frito pie on a bun—no spoon required!

3. The French Onion Dog

French onion soup has been a beloved comfort food for ages, so why not turn it into a hot dog topping? Start with a grilled frank and pile on a generous portion of caramelized onions, allowing their natural sweetness to shine. Melt Swiss cheese (Gruyère if you’re feeling fancy) over the onions and hot dog using indirect heat on the grill, ensuring the cheese gets all gooey and delicious. A sprinkle of fresh thyme adds a touch of herbaceous flavor to round out this decadent creation. The sweet onions and creamy cheese make this hot dog as comforting as the soup it’s inspired by.

4. The Monte Cristo Dog

Who says breakfast foods should be confined to the morning? Inspired by the indulgent Monte Cristo sandwich—French toast stuffed with ham, turkey, and Swiss cheese—this hot dog version gives you all those flavors in a portable form. Begin by turning the bun into French toast, then load it up with a grilled hot dog, slices of ham and turkey, and grated Swiss cheese. Return the creation to the grill until the cheese melts, then finish it off with a drizzle of maple syrup for that signature sweet-savory contrast. It might be perfect for brunch, but honestly, it’s a treat any time of day.

5. The Nacho Dog

If you love nachos, this is the hot dog topping for you. Inspired by the bold flavors of Texas-style nachos, this creation layers refried beans, melted Longhorn cheddar, and pickled jalapeños on top of a grilled hot dog. The creamy refried beans add richness, while the cheddar provides that irresistible meltiness, and the jalapeños deliver the perfect kick of heat. It’s like eating nachos and a hot dog in one bite—a winning combination for sure.

6. The Bacon-Jack Dog

For those who enjoy both bacon and cheese, this is the ultimate indulgence. Start by splitting a hot dog lengthwise and stuffing it with Monterey Jack cheese. Close it up and wrap the entire hot dog in crispy bacon. Cook it over indirect heat to ensure the bacon cooks evenly, then crisp it up over direct heat. Once nestled into a toasted bun, finish it off with creamy avocado slices and a drizzle of chipotle mayo for a smoky, spicy kick. The result? A hot dog bursting with rich flavors—from the melty cheese to the smoky bacon and the cool avocado.

7. The Chili Cheese Dog

No list of creative hot dog toppings would be complete without the iconic chili cheese dog. But instead of using just any old chili, take it up a notch with a homemade batch of chili that’s rich, hearty, and packed with flavor. Top your grilled hot dog with a generous serving of chili, then load it up with shredded cheddar cheese and a sprinkle of chopped onions. Whether you like it mild or spicy, this combination is sure to satisfy any craving.

8. The Guacamole Dog

For a fresh, vibrant twist on the classic, try topping your hot dog with homemade guacamole. The creamy avocado pairs perfectly with the smoky char of the grilled frank, while the lime, cilantro, and jalapeños bring a bright burst of flavor. If you want to take it even further, sprinkle on some crumbled queso fresco or add a drizzle of salsa for an extra layer of taste. This guacamole hot dog is the ultimate fusion of savory and creamy, with just the right amount of tangy heat.


With so many possibilities, it’s clear that the hot dog is a versatile canvas for all kinds of creative toppings. Whether you prefer something sweet, spicy, or savory, there’s no reason to settle for the standard ketchup and mustard. The next time you fire up the grill, don’t be afraid to get a little adventurous with your toppings—your taste buds will thank you!

Green Choices: Testing Four Natural Plant Powders for Vibrant, Healthy Color

​As the season of shamrocks and emerald hues approaches, many of us seek ways to infuse our foods with vibrant green shades without resorting to synthetic dyes. Natural green food colorings, derived from plant-based sources, offer a healthier and often more flavorful alternative. In a recent exploration, four such natural green dyes—spinach powder, matcha, pandan powder, and spirulina powder—were tested to determine which provided the best balance of color, flavor, and versatility.​

The Testing Process

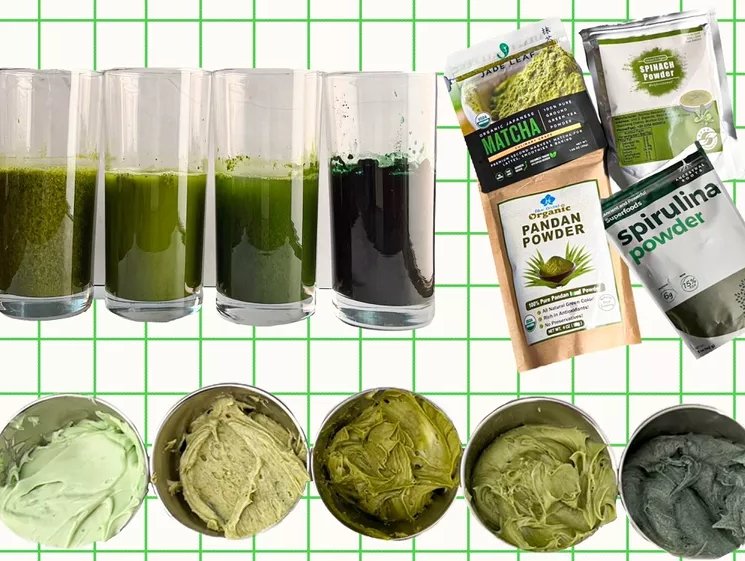
To evaluate these natural dyes, each was incorporated into three common culinary applications: a simple water solution, a Shamrock Shake (a mint-flavored milkshake), and frosting. This approach allowed for a comprehensive assessment of each dye’s performance across different textures and flavors. The criteria for evaluation included color vibrancy, flavor impact, and overall suitability for various recipes.​

Spinach Powder: The Versatile Winner

Among the contenders, spinach powder emerged as the top choice. It imparted a rich, vibrant green color that was consistent across all applications. The flavor was subtly sweet, making it adaptable for both savory and sweet dishes. In the Shamrock Shake, spinach powder blended seamlessly, contributing to a pleasant taste without overpowering the mint flavor. Similarly, when mixed into frosting, it provided a natural hue and a mild flavor that complemented the sweetness without clashing.​

Matcha: The Flavorful Contender

Matcha, finely ground green tea powder, offered a unique flavor profile that was both grassy and slightly bitter. While its color was a lighter green, it added depth to the taste of the Shamrock Shake and frosting. However, its distinct flavor may not be suitable for all palates or recipes. In savory dishes, matcha could serve as an intriguing ingredient, but its use in desserts should be considered carefully to ensure flavor harmony.​

Pandan Powder: The Aromatic Option

Pandan powder, derived from the leaves of the pandan plant, introduced a floral aroma and a soft green color. While it added an exotic touch to the Shamrock Shake, its flavor was subtle and may not be noticeable in all applications. In frosting, pandan powder provided a gentle green tint but did not significantly alter the flavor profile. Its unique aroma makes it a delightful addition to certain desserts, particularly those inspired by Southeast Asian cuisine.​

Spirulina Powder: The Bold Colorant

Spirulina powder, a blue-green algae, delivered the most intense green color. Its vibrant hue made it stand out in the water solution and frosting. However, the flavor was distinctly oceanic, which may not be desirable in all dishes. In the Shamrock Shake, the taste was overpowering, potentially overshadowing the intended flavors. Spirulina’s strong color and flavor make it best suited for specific applications where its characteristics can be appreciated, such as in smoothies or health-focused recipes.​

Conclusion

For those seeking a natural, plant-based green food coloring, spinach powder stands out as the most versatile and palatable option. Its vibrant color, subtle sweetness, and adaptability across various dishes make it an excellent choice for festive occasions like St. Patrick’s Day or for everyday culinary creations. While matcha, pandan, and spirulina each offer unique flavors and colors, spinach powder provides a balanced combination that enhances both the visual appeal and taste of your dishes.​

Incorporating natural green dyes into your cooking not only adds a festive touch but also aligns with a more health-conscious approach to food preparation. By choosing plant-based colorings, you can enjoy vibrant, flavorful dishes without the concerns associated with synthetic dyes. So, the next time you’re preparing a green-themed meal or dessert, consider reaching for spinach powder to achieve the perfect hue and taste.

Cooking with Chemistry: How pH Transforms Your Vegetables

We often think of cooking as a blend of skill, instinct, and maybe a little luck—but behind every perfect roast potato or tender green bean is a quietly powerful force: chemistry. Specifically, pH. While we may happily reach for yogurt in a marinade or a squeeze of lime for a ceviche, many home cooks don’t realize how dramatically pH can shape the flavor, texture, and appearance of vegetables.

Whether it’s adding vinegar to your boiling water or sneaking in a pinch of baking soda, understanding how to tweak pH levels can help you master everything from silky-soft legumes to crisp, vibrant greens. Let’s dig into the science of it—and how it can change your cooking for the better.


What Exactly Is pH, and Why Should Cooks Care?

In the simplest terms, pH is a measure of how acidic or basic (alkaline) a solution is. It runs on a scale from 0 to 14, with 7 being neutral. Below 7 is acidic (think lemon juice or vinegar), while above 7 is basic (like baking soda or lye). This scale might not be something you think about in the kitchen—but it should be.

When it comes to vegetables, pH affects three things: flavor, texture, and appearance. Change the pH of the cooking water, and you can control whether your potatoes come out firm or fall-apart fluffy, whether your green beans stay emerald or fade to army green, and even whether your carrots taste bright or bland.


Flavor: A Tangy Kick or a Chemical Tang?

Adjusting the pH of your cooking liquid doesn’t just change structure—it also leaves a trace on taste.

Acidic ingredients like vinegar or lemon juice add a tangy brightness to vegetables, though they may also leave behind a slight sourness. The more flavorful the acid (say, apple cider vinegar or citrus juice), the more pronounced the taste transfer. Depending on how the vegetable will be served, this might enhance your dish or overpower it.

On the alkaline side, things get trickier. Adding a basic ingredient like baking soda can leave a slightly bitter, soapy flavor if used in excess. You might have noticed this in pancakes with too much baking soda—it’s that strange, off-putting “chemical” taste. Some bases (like lye or quicklime) are much stronger and not typically used in home kitchens for this reason.

Bottom line: manipulating pH always impacts taste. Whether that’s a good or bad thing depends on the dish, the amount used, and your personal preference.


Texture: Pectin is the Secret Player

If you’ve ever wondered why some vegetables turn to mush while others stay toothsome no matter how long they’re cooked, the answer lies in pectin.

Pectin is a structural polysaccharide that acts like glue between plant cells, helping maintain firmness and shape. Its behavior is highly pH-sensitive:

  • Low pH (acidic): Pectin stays intact, which means firmer, crunchier vegetables.
  • High pH (alkaline): Pectin breaks down more easily, leading to soft, sometimes mushy textures.

Understanding this helps explain several classic cooking techniques. In Kenji López-Alt’s crispy roast potato method, for instance, baking soda is added to the parboil water. This raises the pH, breaks down the potato surface, and creates a starchy slurry that crisps up beautifully in the oven.

Conversely, when making extra-crunchy chips or fries, a splash of vinegar in the boiling water helps the potato hold its shape by slowing down pectin breakdown.

This principle also applies to beans: cooking them in a basic solution softens their outer skin by breaking down the pectin, speeding up the cooking process. It’s why some cooks swear by a pinch of baking soda in the pot when boiling dried legumes.


A Simple Kitchen Test: Boiling with pH in Mind

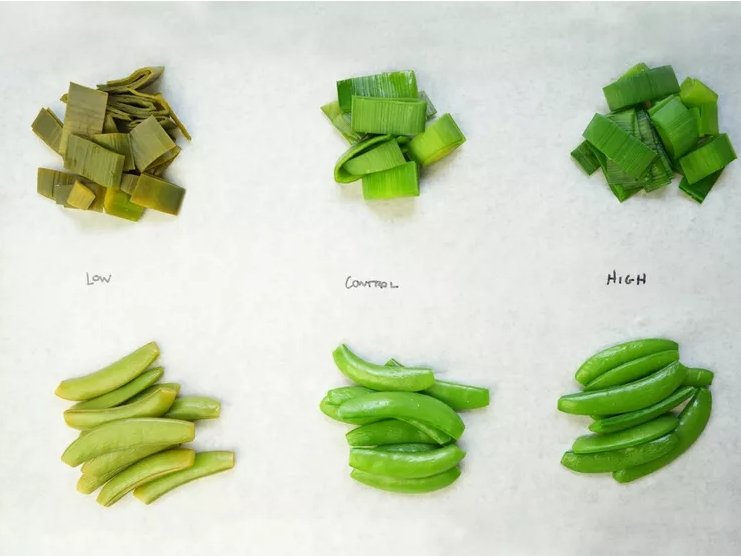
To see these effects in action, a basic experiment was set up: vegetables (potatoes, carrots, green beans) were boiled in three types of water—neutral, acidic (with vinegar), and alkaline (with baking soda).

The Results?

  • Potatoes: Acid-cooked samples held their shape and stayed firm—almost crunchy. The baking soda batch turned fluffy and fragile, practically mashing themselves.
  • Carrots & Green Beans: Acidity preserved color and snap, while alkalinity dulled their color and made them soft, even mushy.

It’s easy to see how you can apply this knowledge strategically. Want your carrots to stay crisp in a salad? Blanch them in slightly acidified water. Craving velvety mashed potatoes? A pinch of baking soda can help break them down faster (just don’t overdo it).


Appearance: A Matter of Color and Clarity

Besides texture and taste, pH can also alter how vegetables look. Acidic water helps retain vibrant colors—think vivid greens and bright oranges—while alkaline water can dull or discolor them. If you’ve ever boiled broccoli and watched it go from bright green to drab olive, now you know why.

Pro chefs sometimes add a dash of vinegar to green vegetables’ blanching water for exactly this reason. Just remember: overdoing the acid can toughen the texture, so find the balance.


Bringing It All Together

Using pH to manipulate your vegetables might sound intimidating at first—like something better left to food scientists or professional chefs. But in reality, it’s just another tool in your kitchen toolkit. Think of it like seasoning: a subtle adjustment can make a huge difference.

Try it yourself:

  • Add vinegar to your boiling water when cooking firm vegetables for a salad.
  • Use baking soda in your bean pot or potato water when you want soft interiors or crispy exteriors.
  • Balance pH effects with how you plan to serve the dish—a vinegar-poached carrot might shine in a bright salad, but fall flat in a rich stew.

Once you start cooking with pH in mind, you’ll never look at your vegetable pot the same way again.

Crispy, Fiery, and Unapologetically Indulgent: Why Air-Fried Buffalo Wings Are Still the Real Deal

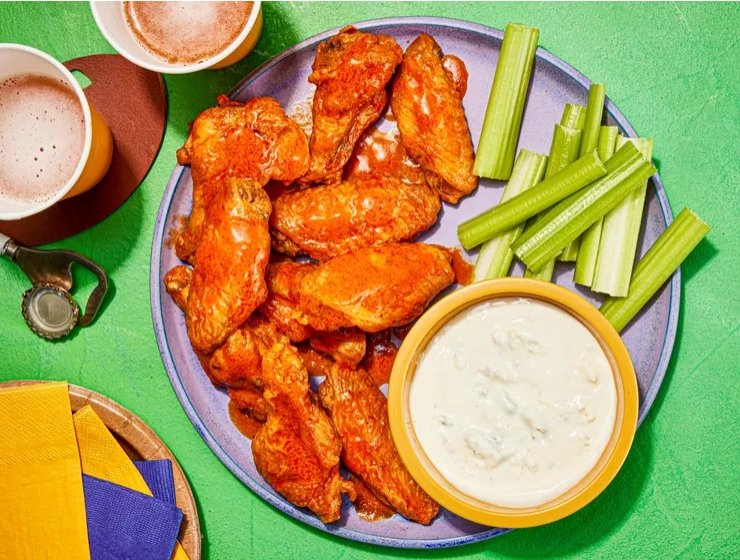
Let’s get one thing out of the way right now: air-fried Buffalo wings are not health food. Sure, they skip the deep fryer, avoid a gallon of oil, and reduce kitchen chaos—but lean and virtuous? Not exactly. And that’s perfectly okay. Because if you’re eating Buffalo wings, your goal isn’t to count calories. You’re here for blistered skin, buttery hot sauce, and finger-licking satisfaction. Maybe with a carrot stick or two for appearances.

While the air fryer might seem like a modern miracle promising lighter versions of our favorite comfort foods, don’t let the countertop size and buzzwords fool you—it’s basically a turbocharged convection oven. And in this case, that’s a good thing. When it comes to wings, the air fryer earns its place on your kitchen counter by doing one thing exceptionally well: turning out crispy, juicy, sauce-soaked wings without the oily drama of deep frying.

Here’s how to make the most of it.


Why Air Fryer Wings Just Work

The genius of the air fryer lies in its ability to blast food with evenly circulating heat, creating a texture that’s shockingly close to deep-fried. Wings, with their high skin-to-fat ratio, are basically designed for this cooking method. That intense airflow renders the fat and crisps the skin at the same time, giving you shatteringly crisp results with zero splatter or cleanup nightmares.

And unlike oven baking, which can take longer and require constant flipping or rotating, the air fryer streamlines the process into a simple set-it-and-forget-it routine—well, almost. There are a few pro tips that’ll help your wings turn out restaurant-worthy.


Tips for Perfectly Air-Fried Wings

1. Don’t Crowd the Basket.
If you want blistered, golden skin and juicy meat, give your wings space. That means leaving a little room between each piece to allow air to circulate. Depending on the size of your air fryer (6-quart models or larger are ideal), you might need to cook in batches. Resist the urge to pile them all in—it’s better to cook two stellar batches than one sad, soggy one.

2. Preheat for Success.
Yes, even air fryers need a little warm-up. Preheating ensures that your wings sizzle the second they hit the basket, jumpstarting the crisping process. Skip this step and you risk limp skin, which nobody wants.

3. Embrace the Baking Powder Trick.
One of the most effective techniques borrowed from Kenji López-Alt’s legendary oven-fried wings recipe is tossing the wings with a mix of salt and baking powder before cooking. This method does more than season the meat—it raises the pH of the skin, promoting browning and encouraging the formation of crispy little bubbles, or micro-blisters, that mimic deep-frying texture.

If you’ve got time, you can dry-brine the wings in the fridge overnight to amplify the effect, but it’s not a dealbreaker. Side-by-side tests showed minimal difference once the wings were doused in sauce—so if you’re hungry now, go ahead and cook ‘em right away.


The Magic of Two-Ingredient Buffalo Sauce

Buffalo wings don’t need frills. At their core, they’re simply fried (or air-fried) wings tossed in a fiery, buttery hot sauce. That’s it. And this version sticks to that time-tested formula: just hot sauce and melted butter. Whisk it together while the wings cook, and you’re good to go.

If you’re using store-bought wing sauce, look for something with vinegar heat and a little tang—Frank’s RedHot is a classic for a reason. Want to get fancy? Add a splash of Worcestershire or a pinch of garlic powder, but know that even the bare-bones combo gets the job done beautifully.


No Shame in Dipping

Buffalo wings are nothing without their sidekicks: chunky blue cheese dressing and crisp veggies. The cooling contrast is part of the appeal—fat meets fire, creamy meets crisp. Celery and carrots are the usual suspects, and while they’re often treated as afterthoughts, they do add texture and brightness to every bite. Plus, they make your plate look a little healthier, if that matters to you (we’re not judging either way).


Go Beyond Buffalo: Sauce Variations to Try

One of the benefits of air frying is that the wings come out clean and uncoated, ready for whatever sauce your heart desires. While Buffalo is the classic, there’s a whole world of flavor waiting to be tossed:

  • Tamarind-Ginger Glaze: Sweet, tangy, and slightly spicy—a perfect balance of bright and deep flavors.
  • Hoisin-Sesame Sauce: Sticky and umami-rich, great with scallions and sesame seeds.
  • Strawberry-Chipotle: A surprising but delicious combo of fruity heat and smoky depth.

Because the wings are cooked separately from the sauce, you can even do multiple flavors in one batch. Toss half in Buffalo, the other half in hoisin, and call it a party.


Final Thoughts: It’s Not About “Healthy,” It’s About Better

We’re not here to claim these wings are guilt-free. They’re still rich, indulgent, and gloriously sauced. But they are better in some ways: faster, cleaner, and more approachable for the home cook. With no need for gallons of oil or elaborate clean-up, you can have pub-style wings on a Wednesday night without second-guessing yourself.

So fire up the air fryer, grab your favorite sauce, and get ready for a wing experience that doesn’t compromise. You won’t miss the deep fryer—and your kitchen will thank you.