

colibr.org | Page 3
Home Blog Page 3

A Lazy Host’s Guide to Serving Oysters Like a Pro

There was a time when I thought hosting a dinner party meant turning my kitchen into a high-stress restaurant, juggling trays of delicate hors d’oeuvres while panicking about overcooked pasta. That era, thankfully, is behind me. These days, I’ve adopted a more relaxed approach to entertaining, one that begins with three simple words: oysters on ice.

Oysters on the half-shell are now my favorite way to kick off any gathering. They’re elegant without being fussy, light but satisfying, and pair like a dream with a glass of bubbly. Best of all, they require minimal prep—no oven timers, no frying pans, no sweating over puff pastry pinwheels. Just oysters, a good shucking knife, and maybe a chilled beverage for the shucker.

The Perfect Party Opener (and Social Buffer)

Beyond their culinary appeal, oysters serve a surprisingly strategic purpose at social gatherings: they provide an escape from awkward early-party small talk. There’s something about standing at the kitchen counter, shucking away, that gives you a purpose—and a natural way to dodge the “So, what do you do?” icebreakers. Guests tend to hover at a respectful distance, often offering to bring you a drink as thanks for your labor. It’s a subtle kind of hosting magic.

If you don’t know how to shuck yet, consider this a sign to learn. Not only will it elevate your parties, it’ll also make you look cool in a “don’t-mess-with-me-I-have-a-knife” kind of way.

My Oyster Education

My crash course in oyster handling came at my first restaurant job, a fine-dining Italian spot in Cambridge, Massachusetts. Every Monday night was buck-a-shuck night, and the line of oyster lovers was out the door by 5:00 p.m. As a lowly prep cook, I was handed a mountain of Island Creek oysters—800 of them—and told to get to work. We’d be sold out by 7:00.

It was grueling, finger-splitting work, but by the end of my stint there, I could shuck like a machine. That job taught me two things: the art of opening an oyster cleanly and quickly, and the importance of serving them at their freshest and best.

Now, after years of shucking for crowds both professional and personal, I’ve developed a tried-and-true method for serving oysters at home without stress. Here’s what you need to know.


Step One: Buy the Best Oysters You Can Find

Start with quality. Look for oysters from reputable sources—fishmongers you trust or specialty seafood markets. Ask questions. Where are they from? How fresh are they? Ideally, you’re looking for oysters harvested within the last few days.

Different regions produce different flavors, so don’t be afraid to experiment. East Coast oysters tend to be brinier and more mineral, while West Coast varieties are often creamier and sweeter.

Buy a few extra in case of duds or shucking mishaps. (It happens. Accept it.)


Step Two: Store Smart

Keep your oysters cold—but not submerged in water. Store them in the fridge in a bowl covered with a damp cloth, flat-side up. Don’t seal them in an airtight container—they’re still alive and need to breathe.

Use them within a day or two for peak freshness.


Step Three: Scrub-a-Dub

Right before serving, give your oysters a good scrub under cold running water using a stiff brush. You’re not just getting rid of dirt—you’re avoiding the nightmare of gritty shell bits ruining the slurp. Clean oysters are happy oysters.


Step Four: Shuck Like a Champ

This part can be intimidating, but once you get the hang of it, it’s deeply satisfying.

You’ll need a sturdy oyster knife (not a butter knife, please), and ideally, a folded towel or shucking glove to protect your hand.

  1. Hold the oyster with the flatter shell on top, hinge end facing you.
  2. Wiggle the knife into the hinge until you feel a pop.
  3. Rotate the knife to pry the shell open, then slide it along the top to sever the muscle.
  4. Lift off the top shell, run the knife under the oyster to detach it, and inspect for shell bits.

Pro tip: Wipe your knife clean between oysters to avoid transferring grit or shell fragments.


Step Five: Ice and Shine

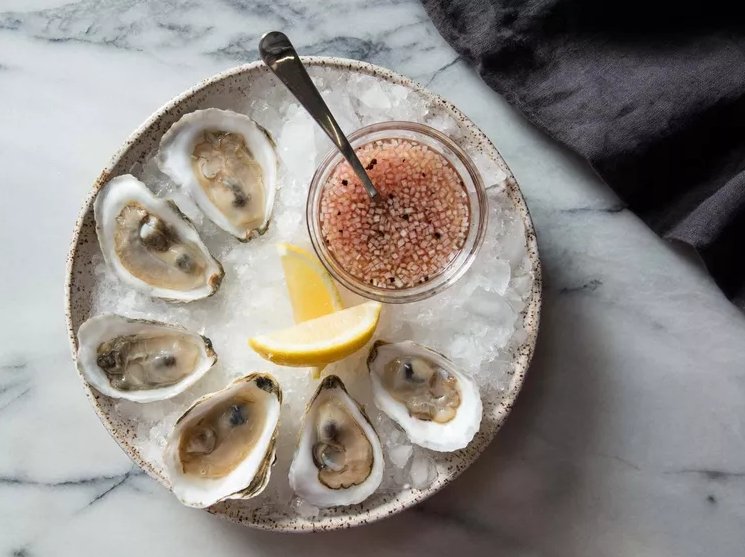
Once shucked, place your oysters on a bed of crushed ice or coarse salt to keep them steady and cold. Not only does this keep them tasting fresh, but it also makes for a show-stopping presentation. (If you’re going solo and don’t want to crush a bag of ice, a cold plate from the freezer works just fine.)


Step Six: Garnish, But Don’t Overdo It

Let the oysters shine. A few classic accompaniments will do the trick:

  • Lemon wedges: Essential for brightness.
  • Mignonette: A simple mix of red wine vinegar, minced shallot, and black pepper is all you need.
  • Hot sauce: For those who like a kick.
  • Fresh herbs: A sprinkle of chives or a microgreen garnish adds elegance.

If you want to get fancy, try flavored mignonettes (think: rice vinegar with yuzu zest or Champagne vinegar with pickled shallots), but restraint is key. Let the ocean speak.


Final Thoughts

Raw oysters aren’t just for fancy restaurants. With a bit of practice and the right tools, they can become your go-to move for effortless entertaining—or a low-key, indulgent night in. They’re simple, celebratory, and—best of all—require no oven preheating, no timing the bake on puff pastry, and no stress. Just you, a knife, some oysters, and a glass of something sparkling.

Now get shucking.

The Irresistible Allure of Pistachio Cream: A Sweet Obsession

My love affair with sweet, nutty spreads began back in high school when I received a bag from my Italian exchange partner. Inside were small jars of Nutella from Italy and a luxurious, gilded jar of Caffarel gianduia spread. From that moment on, I was hooked. The Italian version of Nutella was a revelation, and I became one of those people who couldn’t stop singing its praises, much like those who swear by the superiority of Mexican Coke over the American variety. This experience sparked my ongoing search for the next sweet spread to deliver that same satisfying, indulgent feeling. Over time, I found myself enamored with speculoos, ube halaya, and even chocolate tahini, but none could quite dethrone Nutella. That is, until pistachio cream entered my life.

What Exactly is Pistachio Cream?

Pistachio cream is a smooth, sweet spread made primarily from pistachios, sugar, and oils, all blended together into a luscious, spreadable form. It’s important to distinguish pistachio cream from pistachio butter (also known as pistachio paste), which is made by grinding pistachios into a paste and is typically unsweetened. Additionally, pistachio cream differs from pistachio pesto, which is savory and packed with salty, herbaceous flavors—perfect for drizzling on pasta, but not quite the sweet treat you’re looking for.

This green wonder can be used in various ways: as a spread on toast or pancakes, incorporated into desserts, or simply enjoyed straight off the spoon when you need a quick sugar fix. Similar to other nut butters, pistachio cream comes in both creamy and crunchy varieties, allowing you to choose the texture that best suits your preferences. Each brand has its own formula, often varying the ratio of pistachios, sugar, and oil, with some brands even adding milk powder or flavor enhancers to enhance the overall taste.

Where to Find Pistachio Cream

While pistachio cream has become increasingly popular—thanks in no small part to its rising prominence on social media platforms like TikTok—you might find it somewhat elusive in your typical supermarket. If you’re lucky enough, it may be nestled near Nutella or the other nut butters. However, pistachio cream’s popularity is growing fast, and it’s now showing up in more and more recipes online. If it’s not in your local grocery store, check out specialty food stores or high-end retailers like Whole Foods, where the chances of finding a jar are higher.

In the US, many of the top brands hail from Italy, especially those from Bronte, Sicily. Bronte pistachios are highly regarded, often referred to as “green gold,” and are celebrated for their exceptional quality. If you’re in the market for an expensive but truly delectable option, a jar of Bronte pistachio cream might be just what you’re looking for. It’s worth noting that Bronte hosts an annual Pistachio Festival, where you can dive deep into the culture of these prized pistachios. While Bronte’s offerings might break the bank, the flavor is undeniably rich and nuanced, making it worth the splurge for true pistachio lovers.

For more affordable options, you’ll find a wealth of choices online. Amazon is an excellent resource, offering a wide variety of brands from all over the world. Personally, I’ve enjoyed trying the crema di pistacchio from Marullo and Campo d’Oro’s pistachio butter. Both offer a delightful flavor and texture, though there are still some higher-end options I’m eager to try, such as Giannetti Artisans’ pistachio spread and Pistacchiosa, which have earned rave reviews for their rich, decadent taste. When my current stash runs out, I’ll likely give these more premium choices a try—or perhaps I’ll take a DIY route and try Stella’s pistachio paste recipe to make my own.

What to Do with Pistachio Cream?

Now that you’ve secured your jar of this green delight, what exactly do you do with it? The possibilities are endless, but here are a few of my favorite ways to incorporate pistachio cream into your life:

1. Spread It on Carby Goodness

Start simple. Spread pistachio cream on toast, waffles, or pancakes for a deliciously nutty twist. The richness of the cream pairs perfectly with the softness of the bread or the crispiness of waffles.

2. Top Your Oatmeal

Pistachio cream is a perfect topping for your morning oatmeal. Stir in a spoonful for a creamy, nutty flavor that elevates your breakfast to new heights. For a truly decadent treat, you can top it off with a sprinkle of crushed pistachios for added crunch and texture.

3. Incorporate It Into Desserts

Pistachio cream is a natural fit for desserts. Use it as a filling for cakes or pastries, or incorporate it into homemade ice cream for a creamy, nutty twist. If you’re making truffles or cookies, pistachio cream can add an extra layer of flavor and richness that will elevate your confections.

4. Whipped Cream with Pistachio Twist

For an extra indulgence, whip pistachio cream with some heavy cream to make a luscious topping for cakes, pies, or fruit salads. The pistachio flavor shines through, making it the perfect accompaniment to a variety of sweet treats.

5. Spoon It Straight from the Jar

Of course, one of the best ways to enjoy pistachio cream is straight from the jar. When you’re craving something sweet and don’t have time for preparation, just grab a spoon and enjoy this nutty delight. It’s the perfect on-the-go snack or a quick dessert for moments when you need a little indulgence.

In Conclusion: A Sweet New Obsession

If you’ve never tried pistachio cream before, it’s time to indulge in this rich, nutty spread. It’s not just another passing trend in the world of nut butters; it’s a spread that brings a new depth of flavor to breakfast, snacks, and desserts. Whether you’re spreading it on waffles, incorporating it into a homemade dessert, or enjoying it straight from the spoon, pistachio cream offers a unique, indulgent experience. So, if you haven’t already, it’s time to fall in love with pistachio cream—trust me, it’s worth it.

Choosing the Perfect Melon: A Guide to Picking the Best

Benjamin Franklin famously said, “Nothing is certain except death and taxes.” But if we take a moment to reflect on the world of fruit, it seems we can add “picking the perfect melon” to that list of uncertainties. Choosing a melon can often feel like an art form, fraught with risk and reward. However, with the right techniques and a bit of expertise, you can increase your chances of finding a melon that’s as sweet and juicy as you’ve imagined.

Melons are more than just a summer treat; they are an experience, with every bite offering a range of flavors and textures that play across the palate. But how do you know when you’ve found that perfect melon? It’s not all about the typical indicators like smell or color. According to Thanh Truong, aka Fruit Nerd, a third-generation fruit seller, the key lies in a balance of flavors and mouthfeel—”sweet umami” as he calls it. If you’ve ever bitten into a melon that was too sweet or overly watery, you know that something is missing.

A Sweet Symphony: The Right Balance of Flavors

When it comes to melons, flavor is certainly important, but it’s not just about sweetness. A truly ripe melon offers layers of flavor—slightly acidic, tangy, and with just a touch of sourness. Truong believes this combination, which he describes as “sweet umami,” is what gives a melon its depth. “If a melon is only sweet, it’s like eating straight sugar,” he explains. By focusing on a variety that has more complex flavors, you’ll discover that a perfect melon offers a complete taste experience, not just a sugary burst.

This complexity, however, can only develop when the melon is vine-ripened, a process where it reaches maximum maturity before being harvested. The result is a fruit that’s more flavorful and richer in texture. On the other hand, melons harvested too early—before they’ve fully ripened—may look good on the outside but fail to deliver the satisfying taste you expect. According to Amy Goldman, an expert in heirloom seeds and author of The Melon, the melon you pick is the one you’ll get. “If it’s not ripe when you buy it, it won’t catch up in flavor later,” she notes.

The 5 Senses: A Comprehensive Approach to Selecting the Best Melon

So, how do we ensure we select the melon that will deliver that sweet, complex experience? According to Truong and Goldman, using all five senses will help you get closer to melon perfection. Let’s break it down:

1. Sight: Assessing the Look

Your eyes will tell you a lot about a melon’s quality. The melon should have a smooth, well-rounded shape, free from any dents, soft spots, or bruises. While the visual cues may vary depending on the type of melon, there are some general guidelines to keep in mind.

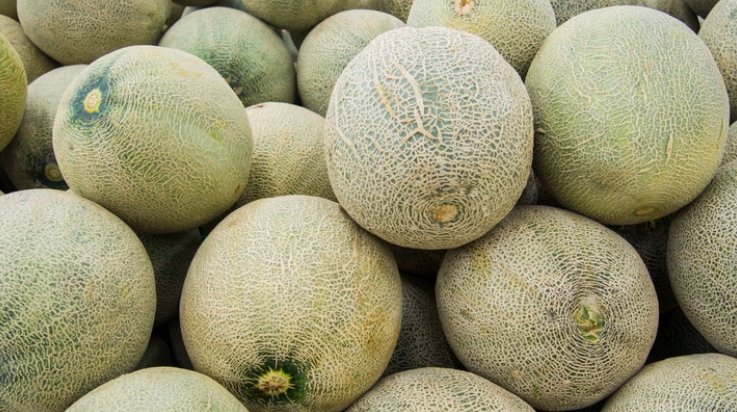
  • Netting on Muskmelons (like Cantaloupe): These melons are distinguished by their raised netting pattern on the skin. The more pronounced and evenly distributed this netting is, the better the melon’s flavor is likely to be. A dense, well-formed netting suggests a mature and ripe fruit that’s been given the time to develop its full flavor profile.
  • Color: For melons like cantaloupe, a deep, golden color on the underside indicates ripeness. For watermelons, look for a deep green rind and a creamy yellow “ground spot” where the melon rested on the ground. This marks a melon that has ripened fully in the sun.

2. Touch: Feel the Weight and Texture

Picking up a melon and giving it a gentle squeeze can tell you a lot about its ripeness. A perfectly ripe melon will feel heavy for its size, indicating that it’s full of juice. A melon that feels light might have dried out a bit or could be under-ripe. As for the texture, feel the skin for firmness—while it shouldn’t be too soft, it should yield slightly when pressed, signaling that the fruit is at the right stage of ripeness.

3. Smell: Inhale the Aroma

A fragrant aroma is one of the best indicators that a melon is ripe. The smell should be sweet and fresh, hinting at the deliciousness inside. Muskmelons, for example, will often have a strong, distinct fragrance when they’re fully ripe. A melon that has no scent may be under-ripe or lacking in flavor altogether. Be cautious of overly strong or fermented smells, which could indicate that the melon is overripe or has started to ferment.

4. Sound: The Knock Test

While not as commonly discussed, some melon enthusiasts swear by the “knock test.” This involves tapping the melon with your fingers and listening for the sound it produces. A ripe melon will give off a dull, hollow sound, while an unripe one may produce a more solid, sharp noise. It’s worth trying this technique for melons like watermelon, where the sound can provide a clue to the fruit’s internal structure.

5. Taste: The Ultimate Test

If all else fails, tasting the melon is the final, foolproof method. Of course, this may not be possible unless you’re sampling at a local market or have a sample at hand, but it’s the best way to verify everything you’ve assessed with your other senses. The sweetness should be well-balanced with hints of tang and acidity, and the texture should be smooth, with a juicy, refreshing mouthfeel.

Risks and Rewards: It’s Not Always a Sure Thing

Despite your best efforts, even the most experienced melon buyers can end up with a disappointing fruit. Not every growing season is perfect, and sometimes the variety simply isn’t as flavorful as others. “You take your chances,” says Goldman, acknowledging that melons can be tricky even for the most discerning shopper.

However, by using all five senses—sight, touch, smell, sound, and taste—you increase your odds of picking a melon that is truly exceptional. Whether you’re enjoying a juicy watermelon on a hot day or savoring a fragrant cantaloupe, the key to the perfect melon lies in careful selection. With these tips, you’ll be better equipped to navigate the melon aisle and find the one that’s worthy of your summer celebrations.

In Conclusion: The Sweet Journey to the Perfect Melon

So, while picking a melon can sometimes feel like a gamble, it’s a gamble worth taking. Armed with knowledge and a few sensory tricks, you can significantly improve your chances of selecting a melon that lives up to its promise. After all, finding the perfect melon is about more than just luck; it’s about knowing what to look for, feel, and smell. So, the next time you head to the market, trust your senses—and maybe even channel a little Benjamin Franklin wisdom—and you might just bring home the juiciest, sweetest melon of the season.

Reimagining Leftover Easter Eggs: Beyond Deviled and Egg Salad

Growing up in a household where crafting was a year-round affair, no holiday passed without a homemade touch. Easter was no exception. The house would come alive with plastic eggs dangling from tree branches, the bunny flag proudly waving in the wind, and baskets of eggs ready for the grand dyeing session. My cousins and I would spend hours coloring those eggs, a welcome distraction that kept us out of the kitchen and away from my grandmother, who was always busy stirring something up and gossiping about the latest family drama.

But here’s the thing: no matter how many eggs we dyed, we inevitably ended up with an abundance of leftover hard-boiled eggs. And while we loved the process of dyeing them, once Easter was over, the reality set in: we had far too many boiled eggs to consume. Deviled eggs? Sure, they’re a classic, but let’s be honest—there’s only so many you can eat. So, what’s a person to do with all those eggs? Well, it turns out, hard-boiled eggs don’t have to be boring, and there are plenty of ways to repurpose them that go beyond the usual suspects like deviled eggs or egg salad. Yes, I’m calling hard-boiled eggs exciting—and I stand by that.

Boiling and Dyeing the Eggs: A Colorful Start

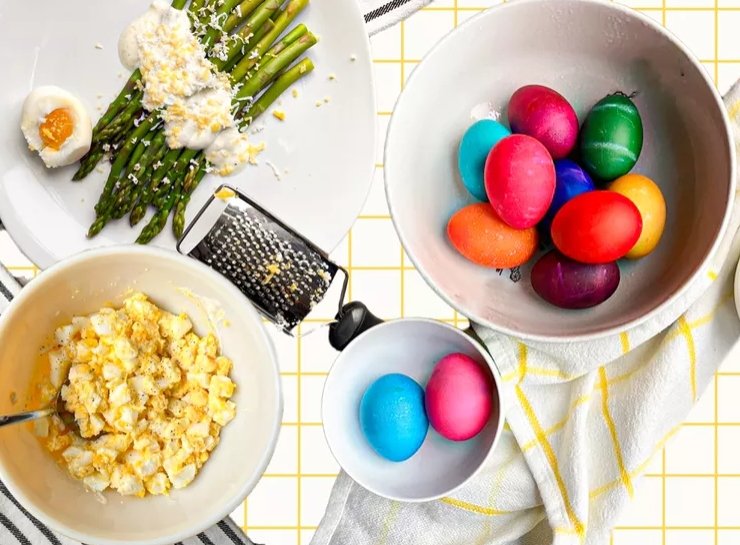
Before we dive into the creative ways to use your leftover Easter eggs, let’s talk about the crucial first step: boiling and dyeing. For those who don’t boil eggs often, there’s a little art to getting them just right. Check out a guide to ensure you get perfectly boiled eggs that are easy to peel, because nothing’s worse than wrestling with stubborn shells. Once you’ve got that down, it’s time for the fun part—dyeing them. You can grab a store-bought kit or go the homemade route with gel food coloring and vinegar, which is exactly what I did for my batch. The results were vibrant and rich, though don’t be alarmed if some color bleeds through onto the shell. In fact, I say that little bit of imperfect color just adds character. Embrace it.

With your eggs now perfectly boiled and beautifully dyed, let’s get to the fun part—repurposing those eggs into something exciting.

1. Egg Curry: Spicy, Comforting, and Easy

If you’re looking to make your leftover eggs a bit more adventurous, an egg curry is a fantastic option. The beauty of this dish is that it transforms the humble boiled egg into a hearty, flavorful meal. The eggs take on the spices and aromatics from the curry, soaking up the deep, rich flavors while keeping their firm texture. Simply heat up a tomato-based curry sauce, toss in your peeled eggs, and let them simmer for a bit to absorb all the goodness. It’s comforting, easy to make, and an unexpected way to showcase your Easter eggs in a savory dish.

2. Avocado Egg Toast: A Trendy Twist on Breakfast

For something lighter and fresher, consider making an avocado egg toast. A perfect brunch option, this dish takes the simplicity of hard-boiled eggs and elevates it with creamy avocado, bright lemon, and a sprinkle of red pepper flakes. Mash your avocado and spread it on a piece of toasted sourdough or whole-grain bread, then top it with sliced hard-boiled eggs. A drizzle of olive oil, a dash of salt, and a squeeze of lemon, and you’ve got yourself a hearty yet healthy breakfast or lunch that’s both filling and exciting.

3. Egg and Potato Hash: A Hearty Meal for Any Time of Day

Eggs and potatoes are a classic combination, but when you add a few extra ingredients like onions, peppers, and your favorite seasonings, you’ve got a dish that’s full of flavor and texture. Simply chop up your hard-boiled eggs and mix them into a hot, seasoned hash of sautéed potatoes and veggies. This one-pot wonder is quick to make, satisfying, and full of protein. Plus, it’s a great way to use up not just leftover eggs, but also any potatoes or veggies lingering in your fridge.

4. Scotch Eggs: A Fun Finger Food

If you want to really go all out, why not make scotch eggs? These deep-fried or baked treats are a delightful way to transform your hard-boiled eggs into a whole new dish. They involve wrapping the boiled egg in seasoned sausage meat, rolling it in breadcrumbs, and then frying or baking it until golden brown. They’re crispy on the outside, soft on the inside, and packed with flavor. Perfect as an appetizer or a fun snack, scotch eggs are sure to be a crowd-pleaser.

5. Pickled Eggs: Tangy and Flavorful

Pickled eggs are a classic pub snack, but they can also be a delicious way to preserve your leftover hard-boiled eggs. Simply place your boiled eggs in a jar, cover them with a pickling brine made of vinegar, water, sugar, and your choice of spices (think garlic, mustard seeds, or dill), and let them marinate for a few days. The result is a tangy, flavorful snack that’s a perfect addition to salads, sandwiches, or simply enjoyed on their own.

6. Egg-Filled Wraps or Tacos: A Quick Meal for Busy Days

For those hectic days when you need something fast, egg-filled wraps or tacos are a quick and satisfying solution. Chop up your boiled eggs and toss them with some sautéed veggies like onions, bell peppers, or spinach. Wrap it all up in a tortilla for a convenient, handheld meal that’s perfect for breakfast, lunch, or dinner. Add a little cheese, salsa, or hot sauce for extra flavor and you’ve got a meal that’s both easy to make and full of fresh ingredients.

A Final Thought: Eggs Are Always Worth Reimagining

While hard-boiled eggs may initially seem mundane, there are so many ways to reinvent them, especially after Easter when you’ve got a batch of leftovers just waiting to be transformed. From spicy curries to trendy avocado toast, these egg ideas are as exciting as they are versatile. The beauty of hard-boiled eggs is that they’re not just an afterthought; they can be the star of a dish, bringing texture, flavor, and richness to whatever you’re cooking. So, next time you find yourself with a fridge full of boiled eggs, don’t just settle for deviled eggs or egg salad. Get creative, and you just might discover a whole new world of egg possibilities.

The Perils of Viral Kitchen Hacks: A Smashing Failure

In the early days of the internet, there was an overwhelming sense of optimism. The World Wide Web promised to be the great equalizer, an unfiltered, democratic space where knowledge could flow freely, connecting people across vast distances. In many ways, that dream came true. Yet, as the internet grew, so did its saturation with content, not all of it particularly valuable or insightful. Among the noise, it often feels like the most banal, shallow, or bizarre ideas rise to the top, especially when algorithms are involved.

One such example is the latest viral kitchen “hack” that made its rounds across TikTok and various food sites: the “rotisserie chicken deboning method.” In this hack, you place a whole, warm rotisserie chicken inside a plastic bag and simply press down to separate the meat from the bones. Supposedly, it’s a mess-free, quick, and genius way to save time. But after seeing the flood of influencers rave about how revolutionary it was, I couldn’t help but be skeptical. Would this really change my life—or just add another layer to the ever-growing pile of internet nonsense?

As much as I wanted to dismiss this hack out of hand, I realized I couldn’t truly judge it without testing it myself. After all, this is what we do at Serious Eats—we test things thoroughly, so we can separate the good ideas from the bad ones. So, armed with two rotisserie chickens and a healthy dose of doubt, I set out to see for myself if this viral method had any merit.

Method 1: Boning a Rotisserie Chicken in a Bag—A Disaster in the Making

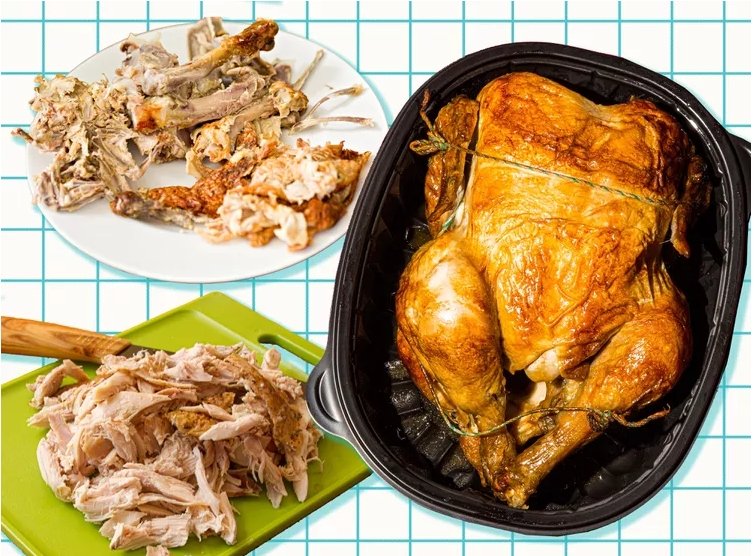
The viral method seemed simple enough: place your hot rotisserie chicken inside a plastic freezer bag, seal it, and press down to release the meat from the bones. The idea is that this is a faster, cleaner way to debone a bird, but right from the start, I ran into issues.

First, there was the challenge of keeping the bag sealed. As soon as I began pressing down on the chicken, the bag popped open. Air was trapped inside, which made it impossible to keep the bag shut. Even after a few tries, the bag wouldn’t cooperate, and I ended up in a tug-of-war with a greasy chicken and a flimsy plastic bag. Not exactly the hassle-free solution I had been promised.

But let’s assume that I just had a bit of bad luck with the bag. As I continued pressing the chicken, the bones did come out, but at what cost? The chicken was completely mashed into a mushy mess, with pieces of skin and bone scattered all around. At no point did I have any clarity about what was happening inside the bag. Was it time to stop pressing? Was the chicken fully deboned? There was no way to tell until I reached into the bag and started sifting through the remnants of chicken parts.

And even after my best efforts to hunt down all the bones, there were still tiny fragments mixed in with the shredded meat. Later that evening, as I tried to enjoy the fruits of my labor, I had to spit out a few surprise bones that had gone undetected. All in all, it was a mess. I had a greasy bag, greasy hands, a chicken that was both over-smashed and under-deboned, and a sense of frustration. This method was neither fast, effective, nor particularly hygienic.

Method 2: The Old-Fashioned Way—Hands-On and Practical

With my second rotisserie chicken, I decided to take the more traditional approach: using my hands to carefully pull apart the meat from the bones. It was simple, direct, and far less complicated than the viral hack.

I started by removing the legs, separating the meat with a few quick pulls. The bones came out instantly, as they tend to do with rotisserie chicken. From there, I worked through the rest of the bird, pulling the breast meat, wings, and back sections apart. There was no mess, no guesswork, and no need to shuffle through a bag of mush. The meat came off in neat, manageable pieces, and the bones were easily identified and discarded.

This method was faster, cleaner, and required no additional cleanup beyond washing my hands twice. The shredded chicken was exactly as I wanted it, and I had full control over how much I shredded or chopped, depending on my needs.

The best part? There was no waste. No plastic bags to toss out, no bones hidden in the meat, and no extra effort spent fighting with a bag that wasn’t made for the job. It took me only 3 minutes and 10 seconds, and I was left with perfectly deboned chicken ready for whatever I planned to do with it.

Conclusion: Sometimes the Old Ways Are Still the Best

After comparing both methods, it’s clear that the smash-in-a-bag method falls short in every way. It’s messier, more frustrating, and ultimately wasteful. The traditional method, while not as flashy, is faster, more efficient, and yields far better results. And the beauty of the classic method is that it gives you more control over your chicken—whether you’re tearing it apart by hand or deciding how to shred it.

This whole experiment serves as a reminder that viral kitchen hacks often fail to live up to their promise. In the rush to grab attention and produce content that’s click-worthy, some ideas are presented as revolutionary when, in fact, they’re just the same old tricks dressed up in trendy packaging. The next time I see a viral cooking hack, I’ll probably skip it and return to what works. Because in the world of food—and, frankly, in most things—simple, tested methods often beat out the newest, flashiest idea every time.

And, perhaps most importantly, we shouldn’t be so quick to believe that every viral idea is truly “life-changing.” Sometimes, the greatest discoveries are the ones that come from sticking with what we know works, and learning from the inevitable failures along the way.

The Art of Pavlova: A Delicious Learning Curve

Pavlova, a beloved dessert shared between Australia and New Zealand, is a delicate creation of baked meringue, topped with fresh fruit and whipped cream. It’s a light, airy delight that’s perfect for a summer afternoon or any celebration. Yet, my first attempt at making this iconic dessert was anything but perfect.

Early in my career, I was given a commission that sounded straightforward enough: make 100 individual pavlovas for a dinner honoring an Australian food personality. At the time, I had only a passing knowledge of the dessert, having previously made something akin to it in the form of a crisp meringue shell encasing mousse. So, I set out with enthusiasm, baking meringue shells that were rock-hard and crisp all the way through. To ensure they stayed that way, I wrapped them up tightly, convinced I had succeeded in creating the perfect pavlova.

The reality, of course, was far from it. It wasn’t until months later, when I stumbled across a proper pavlova recipe, that I realized my mistake. A true pavlova meringue, I learned, should have a crisp exterior with a soft, marshmallow-like center. My pavlovas, unfortunately, were just brittle, making for a rather unpleasant dining experience when people bit into them. I can only imagine the sound of those delicate shells shattering, with bits of egg white scattering in every direction. It was a disaster, a lesson in how even the most basic desserts can go terribly wrong when you don’t understand the essentials.

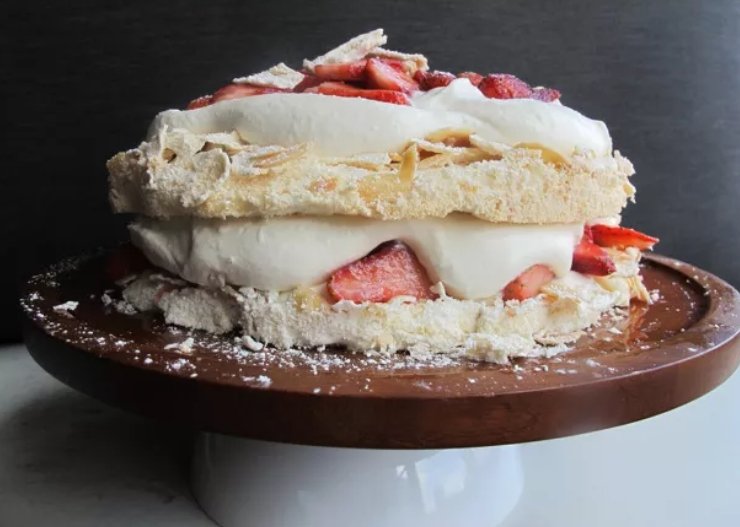
Fast forward to today, and I’ve learned a great deal from that early mishap. Now, when I bake pavlova, I take the time to get it just right. This recipe, in particular, produces a pavlova that is nothing like my original attempt. The key to a successful pavlova lies in the balance of textures. When baked properly, the meringue forms a crisp shell that encases a soft, marshmallow-y center, creating that perfect contrast that makes pavlova such a delight.

To achieve this, I bake the meringues in cake pans, which helps maintain their shape and prevents them from becoming unruly, as freeform meringues sometimes can. The low baking temperature is also crucial, ensuring that the meringue doesn’t darken too much, which would compromise both its delicate flavor and appearance. I’ve also added a small amount of ground almonds to the meringue for texture, which gives it a pleasant crunch without overpowering the softness of the center.

The filling is equally simple and fresh. I macerate strawberries to bring out their natural sweetness and pair them with a generous dollop of lightly sweetened whipped cream. The sweetness of the meringue is enough to balance the tartness of the fruit and the creamy whipped topping. The result is a dessert that feels indulgent yet fresh, with a beautiful balance of flavors and textures that keep you coming back for more.

One of the things I’ve come to appreciate about pavlova is its ephemeral nature. Once assembled, this dessert is best eaten right away. The juicy berries will slowly begin to soften the meringue, and the delicate structure of the pavlova can collapse if left too long. But that’s part of its charm. It’s a dessert that encourages you to enjoy it in the moment, fully aware that it won’t last long.

There’s something beautiful about the fleeting nature of pavlova, much like the fleeting nature of my own journey as a cook. I’ve made plenty of mistakes along the way, but each one has brought me closer to understanding the nuances of food, the importance of balance, and the joy of getting things just right. Pavlova, with its combination of crispness and softness, sweetness and tartness, represents that delicate balance. It’s a dessert that teaches you to appreciate the harmony of flavors and textures, and to embrace the learning process, even when things don’t go as planned.

So, the next time you set out to make pavlova, keep in mind that it’s more than just a dessert—it’s an opportunity to learn, to experiment, and to grow. While my first attempt may have been a disaster, it led me to discover the true beauty of this iconic dish. And with each new pavlova I bake, I continue to deepen my understanding of what makes it so special: the simple joy of a perfect, light-as-air meringue topped with fresh, vibrant fruit and creamy whipped goodness.

A Korean-American Thanksgiving: Embracing Tradition with a Fusion Twist

When I think of Thanksgiving from my childhood, one image stands out—an entire pineapple, adorned with maraschino cherries, standing proudly atop a platter of cocktail slices of loukaniko sausage. It was a Thanksgiving dinner frozen in time, a nostalgic snapshot of the 1960s, with its moss-green carpets, wood paneling, and an abundance of food that was equally American and distinctly Greek. My yiayia’s house—where this scene played out—was a place where both cultures coexisted, and a meal wasn’t just a culinary affair; it was a celebration of family, heritage, and history.

The spread was both classic and curious: the turkey, of course, was garlicky and roasted to perfection, but the stuffing was filled with ground beef rice pilaf, and the potatoes were roasted in a tangy lemony glaze. Alongside the staples of American Thanksgiving—cranberry sauce, jellied from the can, and a big punch bowl filled with orange juice, ginger ale, and grenadine—there were spanakopita and pastitsio, those comforting Greek dishes that wove the story of my heritage into the holiday. It was an eclectic mix, combining traditional Americana with the warmth of my Greek roots.

However, while Thanksgiving was undoubtedly Greek for me, I was also navigating my identity as a Korean girl growing up in suburban Andover, Massachusetts. Though my mother’s family made sure to pass down Greek traditions, my father, in his own attempt to help me assimilate, taught me how to cook spaghetti, ravioli, and burgers, while also nurturing my love for Korean dishes. We shared our cravings for Korean food, finding joy in simple but soul-satisfying dishes like boiled oxtails with kkakdugi (radish kimchi), a perfect fusion of hot, fatty meat with the cool, spicy crunch of kimchi.

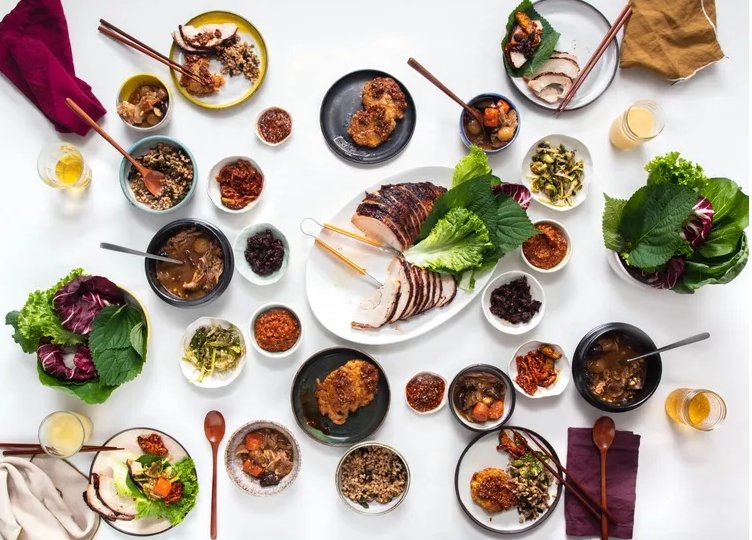
It wasn’t until I moved to New York City to pursue my culinary career that I began to more deeply explore my Korean heritage. As I immersed myself in the flavors and culture of Koreatown, I became particularly captivated by banchan, the small, flavorful side dishes that are served alongside almost every Korean meal. Whether it’s kimchi, marinated potatoes, or blanched greens, banchan offers a wealth of variety and balance, and it quickly became clear to me that these dishes were much more than just accompaniments—they were the heart of a Korean meal, adding depth and contrast to the table.

Banchan fascinated me not only for their taste but also for the joy they brought to the dining experience. Watching a table filled with these vibrant, carefully prepared dishes, I noticed something magical. As each banchan is placed on the table, there’s an immediate sense of giddiness. Chopsticks fly, elbows nudge, and laughter fills the air as everyone dives into the colorful spread. It’s like unwrapping presents at Christmas, with each dish a new gift waiting to be tasted.

The more I worked in kitchens and explored my identity through food, the more I realized the deep connection between food and memory, heritage, and personal history. When I was asked to create a Korean-American Thanksgiving menu, I couldn’t help but think of those early Thanksgivings spent in my yiayia’s house—the blending of Greek and American traditions. The challenge was to do something similar but with a distinctly Korean twist, honoring both my culinary background and my cultural identity.

This Korean-American Thanksgiving menu might not be what you’d expect. It doesn’t feature turkey in the traditional sense, nor does it strictly follow the classic flavors of the American holiday. But like my yiayia’s spread, it’s both familiar and new. It combines fall flavors and comforting elements with a touch of Korean influence, offering a meal that feels distinctly American in its generosity, even as it embraces a Korean spirit.

What stands out most about this Korean-American Thanksgiving meal is its sense of abundance. Like the grand Thanksgiving feasts of my childhood, there’s no shortage of food. In fact, there’s an overabundance of dishes, each more delicious than the last. It’s a meal that will not only feed your family but also leave you with plenty of leftovers to share with your neighbors. The flavors are bold and vibrant, with a focus on balance—sweet, salty, spicy, and sour—and each dish complements the others in perfect harmony.

While the menu may seem unconventional, it does what Thanksgiving is supposed to do: it brings people together. It reminds us that food is not just about taste; it’s about tradition, family, and love. It’s about celebrating who we are and where we come from, all while welcoming new influences and creating something unique.

Much like my yiayia’s Thanksgiving—where Greek-American traditions met the classics of Americana—this meal combines the flavors of my childhood with my experiences as a chef and my journey into my Korean heritage. It’s an American Thanksgiving meal, but one that speaks to a much broader narrative, embracing both my family’s immigrant story and my own culinary evolution.

So, while this Korean-American Thanksgiving may not feature the typical pumpkin pie or mashed potatoes, it offers something just as special—a celebration of what it means to be American in all its complexities. Just like my yiayia’s pineapple-studded dish or the bacon-wrapped treats on the table, this meal invites us to mix and match, to explore new flavors, and to appreciate the many layers of our identities. After all, Thanksgiving is not just about the food we eat—it’s about the stories we tell, the memories we create, and the connections we build, one dish at a time.

Spice Up Your Summer Cookout: A Middle Eastern Feast from Grill to Dessert

As the sun-drenched days of summer beckon, it’s time to elevate your grilling game beyond the classic hamburger. This season, why not embark on a culinary journey to the Middle East, infusing your cookout with vibrant flavors and fresh ingredients? Middle Eastern cuisine offers a delightful array of dishes that are perfect for outdoor gatherings, combining bold spices, fresh herbs, and a rich tapestry of textures. Here’s how you can transform your summer barbecue into an unforgettable Middle Eastern feast.​

1. Grilled Kebabs: A Skewer of Flavor

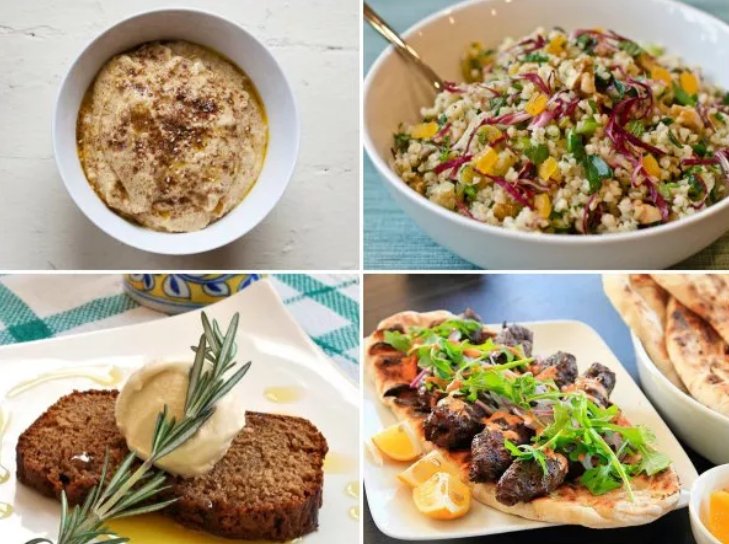
No Middle Eastern cookout is complete without kebabs. Whether you prefer lamb, chicken, or beef, marinating your meat in a blend of yogurt, garlic, lemon juice, and a mix of spices like cumin and coriander will infuse it with deep, aromatic flavors. Skewer the marinated meat with vegetables such as bell peppers and onions, then grill until beautifully charred. The result is a smoky, tender delight that’s sure to be the centerpiece of your meal.​

2. Tabouli: A Fresh, Herby Salad

Tabouli is a refreshing salad that brings a burst of freshness to your spread. Made with finely chopped parsley, mint, tomatoes, and soaked bulgur, it’s dressed with olive oil and lemon juice, offering a perfect balance of flavors. This salad not only complements grilled meats but also serves as a light, healthy option for your guests.​

3. Hummus and Pita: The Quintessential Dip

Hummus, a creamy blend of chickpeas, tahini, garlic, and lemon juice, is a staple in Middle Eastern cuisine. Serve it with warm, soft pita bread for dipping. For an added twist, consider topping your hummus with a drizzle of olive oil, a sprinkle of paprika, or even some pine nuts to enhance its flavor and presentation.​

4. Muhammara: A Spicy Red Pepper Dip

Muhammara is a lesser-known gem that’s gaining popularity. This Syrian dip combines roasted red peppers, walnuts, breadcrumbs, and a touch of pomegranate molasses, resulting in a sweet, smoky, and slightly spicy spread. It’s perfect for serving alongside your hummus and adds a unique flavor profile to your appetizer selection.​

5. Shakshouka: Poached Eggs in Spiced Tomato Sauce

For a hearty addition to your cookout, consider shakshouka. This dish features eggs poached in a flavorful tomato sauce spiced with cumin, paprika, and chili. Serve it in a cast-iron skillet for a rustic presentation, and offer crusty bread on the side to soak up the rich sauce. It’s a comforting dish that can be enjoyed at any time of day.​

6. Baklava: A Sweet Finish

End your meal on a sweet note with baklava, a decadent dessert made of layers of filo pastry filled with chopped nuts and sweetened with honey or syrup. Its flaky texture and rich sweetness provide the perfect conclusion to your Middle Eastern-inspired cookout.​

7. Drinks to Complement the Feast

To accompany your meal, consider serving traditional beverages like mint tea or ayran, a yogurt-based drink that’s both refreshing and tangy. These drinks not only pair well with the spices of the dishes but also offer a cooling effect on warm summer days.​

Final Thoughts

Transforming your summer cookout into a Middle Eastern feast is an exciting way to explore new flavors and culinary traditions. With dishes that range from savory to sweet, and beverages that refresh and complement, your gathering is sure to be a memorable one. So fire up the grill, gather your ingredients, and embark on a flavorful journey that will delight your senses and impress your guests.

The Great Molasses Flood: A Sticky Tale of History and Spirits

In the annals of American history, certain events stand out not just for their significance but for their sheer absurdity. One such event is the Great Molasses Flood of 1919, a bizarre disaster that unfolded in the heart of Boston’s North End.

On January 15, 1919, a massive storage tank filled with 2.3 million gallons of molasses ruptured, releasing a tidal wave of the sticky substance that surged through the streets at an estimated 35 miles per hour. The molasses inundated the area, causing buildings to collapse, knocking over an elevated train, and tragically claiming the lives of 21 people while injuring 150 more. The aftermath was a scene of devastation, with the pungent odor of molasses lingering in the neighborhood for weeks .

This peculiar disaster, often overshadowed by more conventional tragedies, serves as a reminder of the unexpected ways in which industrial negligence can manifest. The tank, owned by the United States Industrial Alcohol Company, had been constructed hastily and was known to have structural issues. Despite warnings from employees about its instability, the company did little to address the concerns. The subsequent legal battles led to a settlement of $628,000, a substantial sum at the time, highlighting the severity of the incident .

Beyond its immediate impact, the Great Molasses Flood also casts a spotlight on the history of rum, a spirit deeply intertwined with the Caribbean and the sugar trade. Rum is distilled from sugarcane by-products such as molasses or sugarcane juice. The process involves fermenting these materials and then distilling the resulting liquid, often aging it in oak barrels to develop its distinct flavor. The origins of rum trace back to the 17th century in the Caribbean, where it became a staple of colonial economies and naval traditions .

The production of rum is a testament to the ingenuity of utilizing by-products in the creation of a beloved beverage. Molasses, the very substance that caused the Boston disaster, is now transformed into a key ingredient in rum, showcasing the multifaceted nature of this sweet syrup.

In conclusion, the Great Molasses Flood of 1919 is not just a tale of a bizarre accident but also a narrative that connects to the broader history of rum and the sugar industry. It serves as a reminder of the unforeseen consequences of industrial oversight and the complex legacies of the products we consume.

Navigating the World of Asian Noodles: A Culinary Journey

Asian cuisine boasts a rich tapestry of flavors, textures, and traditions, with noodles playing a central role in many dishes. From the bustling streets of Bangkok to the serene temples of Kyoto, noodles are more than just a staple—they’re a cultural emblem, a symbol of longevity, and a testament to centuries of culinary evolution. However, for the uninitiated, the myriad of noodle varieties available can be overwhelming. This guide aims to demystify the diverse world of Asian noodles, offering insights into their origins, characteristics, and culinary uses.

Understanding the Diversity

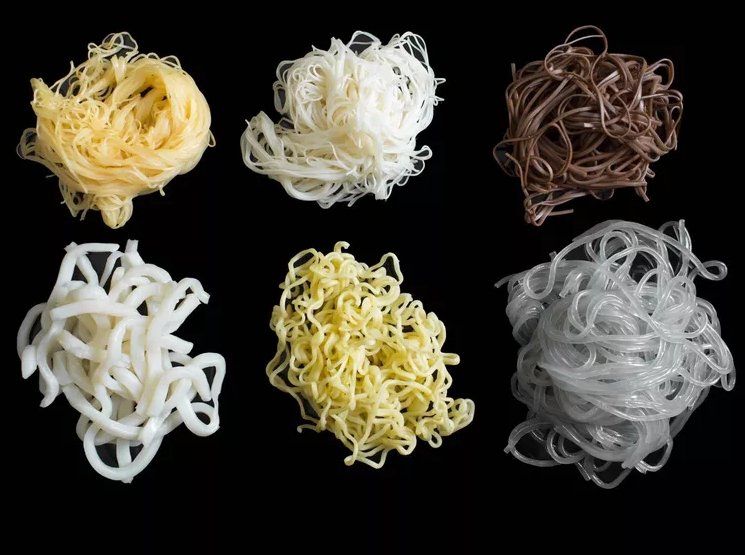
Asian noodles are as varied as the cultures they originate from. Unlike Italian pasta, which predominantly uses durum wheat, Asian noodles are crafted from a plethora of ingredients, each imparting unique textures and flavors.

  • Wheat Noodles: These are perhaps the most familiar to Western palates. Varieties like lo mein and chow mein are made from wheat flour and often include eggs, resulting in a chewy and elastic texture. The preparation methods—stir-frying for chow mein and tossing for lo mein—further distinguish these noodles in terms of texture and flavor.
  • Rice Noodles: Predominantly used in Southeast Asian cuisines, rice noodles are made from rice flour and water. They come in various forms, from thin vermicelli to wide flat noodles. Their neutral flavor makes them versatile, absorbing the essence of the broths or sauces they’re paired with.
  • Glass Noodles: Also known as cellophane or mung bean noodles, these translucent strands are made from mung bean starch. They have a slippery, almost gelatinous texture and are commonly used in Thai and Chinese dishes, such as stir-fries and soups.
  • Buckwheat Noodles: Soba, a staple in Japanese cuisine, is made from buckwheat flour. These noodles have a nutty flavor and are often served chilled with a dipping sauce or in hot broths.
  • Sweet Potato Starch Noodles: Known as dangmyeon in Korea, these noodles are made from sweet potato starch and are a key ingredient in dishes like japchae. They have a chewy texture and absorb flavors well.

Cultural Significance

Noodles in Asia are not merely food; they carry deep cultural meanings. In many cultures, the length of the noodles symbolizes longevity, and they are often served during birthdays and New Year celebrations. For instance, in Japan, toshikoshi soba is eaten on New Year’s Eve to signify the crossing from one year to the next.

Choosing the Right Noodle

Selecting the appropriate noodle for a dish can be daunting given the vast array available. Here are some tips to guide your choices:

  • Consider the Dish: The type of noodle often dictates the dish. For example, pho requires flat rice noodles, while pad Thai uses thin rice noodles. Stir-fries like yakisoba are best with wheat noodles.
  • Texture Matters: If you prefer a chewy bite, opt for wheat or buckwheat noodles. For a softer texture, rice noodles are ideal. Glass noodles provide a unique, slippery feel.
  • Cooking Time: Different noodles have varying cooking times. Rice noodles cook quickly, often in under a minute, while wheat and buckwheat noodles may take a few minutes longer.

Cooking Tips

  • Avoid Overcooking: Overcooked noodles can become mushy. Always follow the recommended cooking times and rinse noodles under cold water after cooking to stop the cooking process.
  • Use Appropriate Sauces: Some noodles, like soba, are best enjoyed with light dipping sauces, while others, like lo mein, pair well with rich, savory sauces.
  • Storage: Dried noodles have a long shelf life and should be stored in a cool, dry place. Fresh noodles should be consumed promptly or refrigerated for short-term storage.

Conclusion

The world of Asian noodles is vast and varied, offering a delightful exploration for culinary enthusiasts. By understanding the different types of noodles and their cultural contexts, you can enhance your cooking repertoire and appreciate the rich traditions behind each dish. So, the next time you find yourself in an Asian market, embrace the adventure—your palate will thank you.